How To Clean A Gas Cap Vent (Step-by-Step Guide)
The gas cap on your lawnmower may seem like an inconsequential piece of equipment, but it actually plays a vital role. It helps to prevent gas leakage, saving you money on fuel costs and preventing the emission of dangerous gas fumes from permeating the air.
Testing and cleaning the cap vent is relatively easy. Follow this step-by-step guide to test your fuel cap venting and also to clean out the fuel cap when the time comes. The venting itself takes no special tools and can be done in a relatively short amount of time.
Do You Need a Mower Repair Service?
Get free, zero-commitment quotes from Lawn Mower Repair near you.

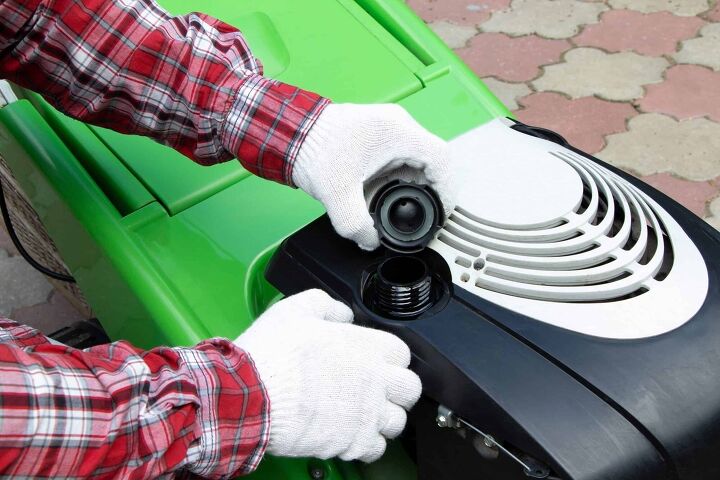
Properly Cleaning the Cap
In order to maintain the functionality and integrity of the fuel cap and its venting, you will need to clean the cap from time to time. By doing this, you can prevent a build-up of debris, dirt, dust, and grass from clogging up the venting.
Step 1: Use a Dry Rag
Cleaning the gas cap is a relatively simple process unless you have allowed dust, dirt, grime, and debris to build-up on it over time. If the debris is relatively loose, you can use a dry rag to get most of it off. This should leave your gas cap filter working properly most of the time.
Step 2: Getting a Deeper Clean
In most cases, while a dry rag will do the job, a deeper clean is required. This is because the aforementioned dirt, dust, grass, grime, and debris can get into all of the little crevices of your lawn mower’s gas cap.
So, to get a deeper clean, try using something like a paintbrush. The tiny bristles are able to get into the finest and smallest of areas with ease, allowing for a “no stone unturned” style of cleaning. By performing a deeper clean, you also prevent that dirt, dust, and debris from getting into your gas tank, gas line, and any of the other components of the lawnmower. That should prolong its life, allowing you to use it for far longer.
Step 3: Give it a Soak
In extreme cases of debris build-up, simply wiping it or using a paintbrush may not be enough to get the job done. Without regular cleaning, a build-up can occur and make it much more difficult to clean in a shorter time.
Try using an industrial cleaner mixed with some water. Allow it some time to soak so that the cleaner can get into all of the tough areas and break down the debris, grass, and dirt. Bring it out of the mixture and allow it proper time to dry before returning it back to the lawnmower.
Testing the Cap Venting
You may not be aware right away if the fuel cap venting is working properly. For this reason, you may need to run a fuel cap venting test to check the performance of the fuel cap. It takes a couple of quick steps, but you will know for sure if the cap is venting properly.
Step 1: Make Sure You Have Plenty of Fuel
Before we can test out the integrity of the fuel cap venting, make sure that your lawnmower has plenty of fuel. If the tank is particularly low, you may not be able to perform the test accurately. You don’t need to have the gas tank spilling over, but a healthy amount will be required to perform the testing.
Step 2: Secure the Gas Cap
Just as you would want to when mowing, make sure that you return the cap and properly secure it. It does not need to be overly tight, simply tight enough to perform its required duties. A loose gas cap will not allow you to properly test it, so ensure that it is secure before moving on to the next step.
Step 3: Locate and Remove the Fuel Line
Before you begin this step, have a container ready to catch the fuel as it drains. Locate the fuel line (it should be directly under the gas tank) and carefully detach it from the fuel tank itself. Don’t force it if it is tight; this could strip and damage the line and keep it from securing properly again.
The purpose here is to determine if the cap is venting properly. If it is, the fuel should drain completely into the basin below. Should it stops draining about halfway through, this is because the venting function is not working properly. If you are satisfied that the cap is venting properly, you can reconnect the fuel line once again.
How Does a Vented Gas Cap Work?
Gas caps on the lawnmower are designed to vent out very small amounts of air down into the gas tank line. It has a one-way release valve in it that is activated by certain amounts of pressure. When the pressure inside the tank equalizes, the valve then closes off.
The valve inside the cap is set to balance out the air pressure to match the surrounding atmosphere. Without proper venting, gas can also become trapped in the tank instead of flowing down into the gas line, distributing to the other components of the lawnmower.
How Do You Know the Fuel Cap is Bad?
While it may not be readily apparent that your fuel cap is bad, there are a couple of signs that can indicate that you may need to replace it. The first is that the cap won’t tighten properly. The cap needs to secure properly to keep the fuel in the tank itself.
Another important sign to look for is the noticeable smell of fuel. If you start to notice a palpable gasoline smell, that is a pretty good indication that the gas cap is not properly secured. Sometimes, it can be as simple as securing the gas cap, but it can also mean that you need to replace the piece entirely.
Why the Gas Cap Clicks
One of the best ways to know if your gas cap is properly secured is if you hear that familiar clicking sound. This is caused by the pressure valve resetting itself. So, if you don’t hear the clicking noise, it could be a good indication that the pressure valve on the gas cap isn’t working properly.
Right underneath the gas cap, there is a rubber gasket that is designed to create an airtight seal between the gas cap and the base of the fuel filler neck. So, when you hear that clicking noise, this is an indication that your gas cap has secured properly with the fuel filler neck.
Do You Need a Mower Repair Service?
Get free, zero-commitment quotes from Lawn Mower Repair near you.
Over-Tightening the Cap
It is definitely necessary to ensure that the gas cap is properly secured. But there is such a thing as over-tightening the gas cap. When the gas cap is improperly tightened – either too little or too much – gas fumes will leak out from the tank.
Make sure that you tighten until you feel the clicking. Though you think it may be providing extra tightening, torqueing on the cap can only lead to damage. Stopping after the clicking noise not only ensures that the cap has secured properly, it also gives you a natural stopping point when tightening the gas cap on your lawnmower.
Related Guides

Ryan Womeldorf has more than a decade of experience writing. He loves to blog about construction, plumbing, and other home topics. Ryan also loves hockey and a lifelong Buffalo sports fan.
More by Ryan Womeldorf