


How To Fix Worn Spots On Kitchen Cabinets
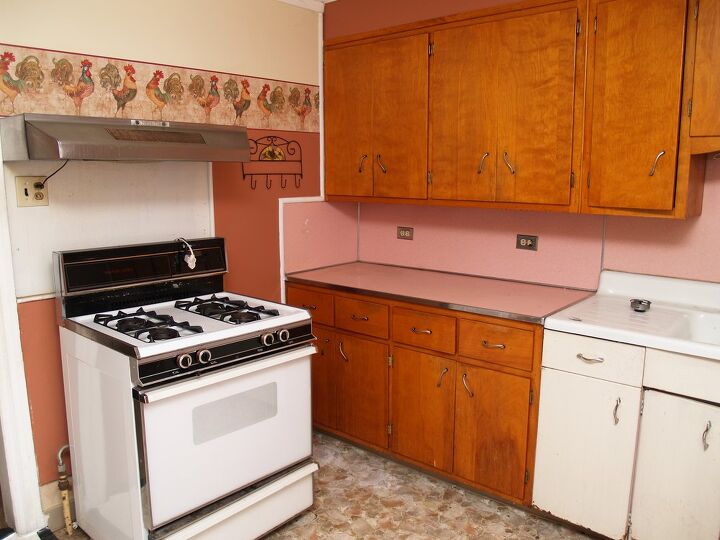
The kitchen is one of the most commonly used rooms in a home. It doesn’t take much time before you start seeing everyday wear and tear on things like counters and cabinets. Thankfully, there are alternatives to replacing all of your cabinetry if you have spots that need touch-ups.
You can fix these worn-out spots by staining or painting the area. It will give your kitchen an instant facelift and can last for ages. This is an easy DIY project that you can do on a rainy afternoon and the best part? It’s budget-friendly.
I wanted to share with you the step by step instructions for both restoring methods. I’ve also included a detailed cabinetry maintenance guide to help you keep your refreshed cabinets looking great.
Do You Need to Hire a Cabinet Refinishing Contractor?
Get free, zero-commitment quotes from pro contractors near you.

When Should You Restore Cabinets?
Because the kitchen is one of the most highly trafficked rooms in the home, it won’t take long before you need to restore cabinets. This time can be even less if you have multiple young kids or pets. Wood naturally fades, and smudge marks are natural over time.
While I do consider this an easy DIY task, it may not be for everyone. Consider your skill level moving forward, and remember you can always hire a professional if you don’t feel confident. As soon as you start seeing worn out spots, it’s time to pick up the supplies and get your cabinets looking new again.
Tips for Restoring Cabinets
Before we dive into how to restore your cabinets, there are a few things I wanted to say. Firstly, it’s crucial not to skip the cleaning and sanding steps we’ll discuss. If you do, the stain and finish may not properly adhere to the surface.
It’s also really important that you wear a mask because paint and stain can have a strong chemical order. If you’re using a one-step product, avoid opening windows or garage doors. This will allow dust particles to come in and settle on the surface before it’s finished.
Lastly, don’t forget to use vinyl gloves while working with stain or paint. Both of these can be difficult to remove, and some people may have skin reactions.
Restoring Cabinets Using Stain
If you’re working with stained cabinetry, restoring them is a breeze. It won’t cost you a ton of money, and someone without much home improvement experience can tackle the job. I think the most difficult part is finding a stain that perfectly matches the rest of the cabinet.
Working With Dark Tones
Here’s what you should do if you have darker stained cabinets in your kitchen that need restoring.
Step One: Cleaning the Area
The very first thing you’ll want to do is clean the area you’ll be staining. Like you read earlier, it’s crucial to do this step. Cleaning the area gets rid of grease, debris, dust, and any other grime or dirt.
I suggest using warm water and mix it with TSP. This will help to get off any junk that just soapy water might miss. Plus, it’s safe to use on multiple surfaces and is inexpensive.
Step Two: Sanding the Cabinets
After the area you’re restoring is clean and completely dry, it’s time to sand. You’ll want to sand relatively lightly to ensure you don’t strip off too much of the surface. Then use a tack cloth to get rid of the excess dust that sanding leaves on the surface.
Step Three: Apply the Stain
Next, apply the polyurethane varnish according to the directions on the packaging. A varnish-stain combo is a great way to get the job done without needing multiple applications. Allow this to dry completely before using the area in your kitchen again.
Working With Light Tones
If you have lighter cabinets, follow the next set of directions to have them looking gorgeous in no time!
Step One: Removing Stain
The first thing you’ll want to do is remove as much of the old stain as you can. You can use a paint remover, a stripper, or chlorine bleach. To get the stain off, you can use your own strength or a scraper to get into the contours of the cabinets.
Step Two: Wood Filler
For the second step, apply wood filler to any dents or deep scratches. You can skip this step if the surface is already smooth or without any flaws. Even if you have the smallest of cracks, a wood filler can make a big difference.
Step Three: Applying New Stain
Apply the new stain per the directions on the packaging. You may need multiple coats to get the desired shade to match your cabinets. Let it dry completely before putting on a protective sealer.
Take 000 steel wood and clean the area with a tack cloth. Make sure you get rid of any excess sealer to have a flawless finish.
Restoring Cabinets Using Paint
If you have painted cabinets, you can easily restore them just like you would with stain. From my experience, paint seems to wear a little faster than stain, and these directions below will help you get the job done.
Step One: Remove Old Paint
For the first step, when working with painted cabinets, you’ll want to remove as much of the old finish as possible. This gives you a fresh surface to work on and will provide a more cohesive finish once the new paint is added.
Step Two: Apply Stripper
Next, using the same paint stripper for step one, add a bit more to scrape off any extra paint. After you’re satisfied with the area made available, move onto the next step.
Step Three: Apply Wood Filler
Just like you would with stain, apply a wood filler. This will make any dents, scratches, or marks smooth and virtually disappear. Allow this to dry completely before continuing the restoration process.
Step Four: Sand It Down
Once the wood filler is dry, sand the area using 100-grit sandpaper. Then, move onto 180-grit and end with 220-grit. Take a cloth, broom, or vacuum to get rid of the debris from sanding the area down.
Step Five: Paint and Seal
Take a tack cloth and wipe down the surface before painting it. Make sure you’re painting in the same direction and don’t shy away from doing multiple coats. Once the paint is dry, it’s time to add a sealer.
You can go the extra mile by wiping the area down again with a clean towel before applying the sealer. After it’s totally dry, take 000 steel wood and rub it lightly on the newly painted area. Finish by wiping the cabinet clean of any residual debris.
Cabinet Maintenance
In order to have your restoration lasting as long as possible, it’s important to keep up routine maintenance. While you may wipe your cabinets down when you clean the kitchen, this isn’t always enough.
Grease and grime can quickly build up and destroy the look of your cabinetry. Make sure you’re using a soft cloth that is damp with warm water. Cabinets should be cleaned at a minimum bi-weekly.
If water isn’t doing the job, you can add mild dish soap to the cloth. Wipe in the direction of the grain and make sure there isn’t any residual moisture leftover from the towel. If that’s still not enough, make a paste with warm water and baking soda.
Put the paste on a sponge and scrub the stubborn area until the stain goes away completely. Rinse the area with water before drying it with a clean towel.
The following products and ingredients can damage cabinets, so avoid using them or any product that contains them:
- Petroleum-based products
- Solvents
- Bleach
- Strong detergents and soaps
- Nail polish remover
- Paint thinners
- Plastic brushes
- Steel wool
- Scoring Pad
- Ammonia
Do You Need to Hire a Cabinet Refinishing Contractor?
Get free, zero-commitment quotes from pro contractors near you.
Related Questions
Is it cheaper to refinish or replace cabinets?
Refinishing cabinets will make a much smaller dent in your wallet than replacing, saving you upwards of $5,000. It also conserves wood and is better for the environment. If you don’t have wood cabinets, refinishing might not be an option.
Can I just replace cabinet doors?
Homeowners are eating up a newer trend that involves just replacing cabinet doors. This is a fast DIY project that can bring an updated look to your kitchen. It’s easy, affordable, and can spruce up any home.
Should I paint or get new cabinets?
It depends on what material you’re working with and whether or not you have any future kitchen restoration plans. Replacing your kitchen cabinets can look more cohesive, while painting is cheaper and easier to do. Cabinet paint is incredibly durable and can last as long as the rest of your cabinetry.

Kirstin is a passionate writer who loves helping people learn new things when it comes to home improvement. When she's not behind a keyboard, she enjoys DIY projects, crafts, spending time with her pets, and making videos. She hopes that with all she writes, someone is finding a solution to their home improvement needs.
More by Kirstin Harrington


![12 Washing Machine Brands to Avoid [with Recall Data]](https://cdn-fastly.upgradedhome.com/media/2023/07/31/9075781/12-washing-machine-brands-to-avoid-with-recall-data.jpg?size=350x220)


