How To Keep A Wood Stove Burning All Night (Do This to Stay Warm!)
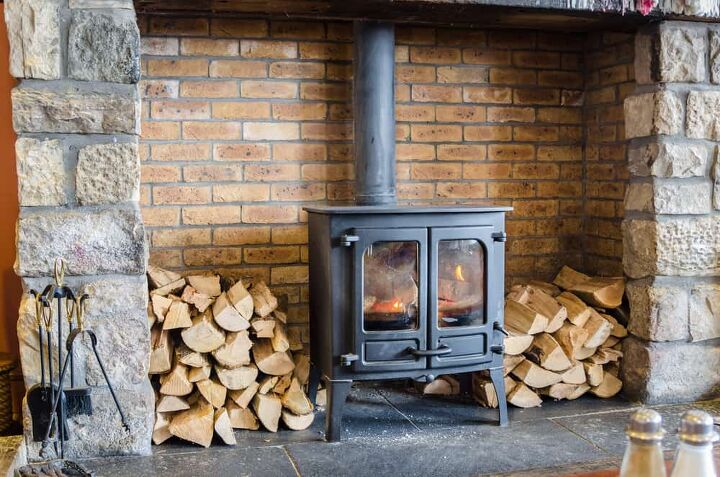
There is no doubt that a roaring fire in the winter can be the ultimate mood setter. Not only does it create an ambiance that simply can’t be beaten, but it keeps your home nice and cozy. That is, so long as the wood stove is still burning.
Waking up in the morning to a cold wood stove can be the opposite feeling. Wouldn’t it be wonderful if, instead of waking up to a cold room and stove, you kept the fire going all night? By building a bed of coals, adding a large piece or two of wood, and closing off the damper, you can keep that fire roaring long into the wee hours of the morning.
Do You Need Gas, Pellet, or Wood Stove Installation?
Get free, zero-commitment quotes from pro contractors near you.

Step 1: Remove Unusable Ash
Start by protecting yourself with a pair of heat resistant gloves and a fireplace shovel. You will want to clear away any pieces of white ash that you see near the front of your stove. It is important that you don’t remove all the ash as you will need to build a base for your fire.
- Safe removal. It is best to put the white ash in a box or bag for now. It can be a messy job removing ash and you don’t want to make things unnecessarily complicated.
- If the ashes are still burning. If you notice that the ashes in the middle of the stove are still very hot or burning, don’t remove them. Doing so can be potentially dangerous.
Step 2: Raking Live Coals
Get a long-handled rake – they make ones specifically for fireplaces – and use it to reach into the stove. Starting at the bottom, rake forward to move the coals from the back of the stove to the front, closer to the door.
The coals should be in the shape of a rectangle and should ultimately take up about half of the stove. Make sure that you leave space at the back of the stove for the logs when you place them. Make sure that you don’t pull hot coals out of the stove and onto the ground as it can be a major fire hazard. If necessary, use your fire-resistant gloves to pick up any stray coals that spill out.
Step 3: Add Kindling
Depending on how long the fire has burned, you might have to reignite it. If that is the case, you can simply crumple up a few pieces of newspaper and set them on top of the coals. You will light these after the logs have been positioned, restarting the fire by way of heating up the coals.
Be aware of hot coals. If there are any coals that are still burning, they could make the newspaper catch quicker than you expected.
Step 4: Picking Your Wood
Now that the stove has been properly prepared, you can focus on the wood that will be burned. You will want one large piece and a couple of smaller pieces of wood. This will be the primary source of fuel for your fire.
- Types of wood. Generally speaking, you will want to go with pine, hickory, or oak. They tend to burn at a slower rate and are great if you are looking to create an overnight fire.
- Laying the logs. Make sure that you lay the largest piece down horizontally. Depending on how big that piece is, you might have to cut it down to ensure that it fits in your stove.
- Different woods. If you can’t find one of those types of woods, anything else will do. Just keep in mind that you might need an additional large piece and a couple more smaller pieces to ensure that the fire will burn overnight.
Step 5: Dry Logs
This is perhaps the most important step in the process. When selecting your wood, make sure that you find something that is not only evenly colored but dry to the touch. Make sure that you check the ends as well.
Wood that has green spots or noticeable moisture will not burn as long as dry wood if at all. If you don’t have reliable access to firewood, consider going to a home improvement store for an easily accessible supply of wood.
Step 6: Put the Wood at the Back of the Stove
With your coal pile in place from one of the earlier steps and your wood selected, it is now time to place the large log. Make sure that it is at the back of the stove, behind the coals, and sitting as horizontally as possible.
It is also important that you keep the large log as far away as possible from the coals. Ensure that the log sits flat so that it can provide lasting, consistent fuel for the fire throughout the entirety of the night.
Step 7: Stack the Smaller Pieces
Now that the largest piece of wood, our fuel in this instance, is in place, it is time to lay the other pieces around it. Make sure that you use caution and any tools that may help ensure even coverage. Like the large piece, the smaller pieces should be laid horizontally as well.
Make sure that one of the smaller pieces of wood is touching the back portion of your coals. Also, the large log should be covered at the front and top by your smaller pieces of wood. The smaller pieces will insulate the large piece from the heat.
Pack the pieces as tightly as possible and don’t let any of them get behind the large log. This can cause the large log to ignite earlier than it is meant to.
Step 8: Ignite the Kindling
If you felt that adding kindling was necessary, now is the time to ignite it. A simple lighter should do to get the process going. When the kindling has been lit, close the door and watch to ensure that the coals turn red in color.
If the coals don’t heat properly, you might have to add a few more pieces of newspaper. Re-light those pieces to provide more heat so that the stove has a chance to burn properly.
Step 9: Open the Inlets
When the load has been added and the kindling ignited, turn the lever on your stove that controls the air vents. Make sure that they are totally open so that oxygen can flow into the stove. Proper oxygen levels will ensure that the fire stays strong long into the night.
Do not leave the stove unattended with the vents open. Keep an eye on the coals to make sure that the fire burns properly and doesn’t get too hot too quickly.
Step 10: Reduce Airflow
Give it about 15 minutes; the pieces in the back of the stove should have a thick, black coating on them. When you notice that black coating, it’s time to slowly close the air inlet until it is open only slightly.
Leaving it open just a little will keep the fire under control and dictate how much oxygen is available for the burn throughout the night. Closing the vent all the way can potentially smother the fire and cause it to go out.
Step 11: Remove Ashes in the Morning
When you wake up the next morning, the fire should still be going, albeit nowhere near as strongly as it was before. Use your shovel to gather up and dispose of the ash that burned throughout the night. This will be the first step towards preparing for another night of efficient burning.
Do You Need Gas, Pellet, or Wood Stove Installation?
Get free, zero-commitment quotes from pro contractors near you.
Related Questions
Why Does My Wood Stove Burn So Fast?
You may find that your wood stove is burning up way too fast, eventually petering out far sooner than you had hoped. The most common reason for that is that the air vents have been left open too far. Remember, oxygen fuels fire and too much of it can cause the fire to burn too hot, too quick.Keeping the vent open just a little will provide enough oxygen to keep the fire burning without doing so too quickly. Just make sure that you don’t close the vents entirely or the fire could go out. Then, you will be left at square one.

Ryan Womeldorf has more than a decade of experience writing. He loves to blog about construction, plumbing, and other home topics. Ryan also loves hockey and a lifelong Buffalo sports fan.
More by Ryan Womeldorf


![10 Best Electric Lawn Mowers - [2022 Reviews & Top Rated Models]](https://cdn-fastly.upgradedhome.com/media/2023/07/31/9070486/10-best-electric-lawn-mowers-2022-reviews-top-rated-models.jpg?size=350x220)